Commercial Concrete Polishing In Denver & Throughout Colorado

Polished concrete floors are the new rage in commercial and industrial facilities. This is due to the fact that they reflect overhead lighting and brighten indoor spaces, create an easy clean-up surface, and are insanely durable!  At Zenith Painting and Coatings, our coating experts and commercial floor polishers have more than 10 years experience in the field. We work efficiently and in a timely manner, reach out to us today!

At Zenith we strive to provide only the highest quality in concrete polishing.

We make sure every one of our polished concrete floors meets or exceeds all forms of industry testing recognized by the Concrete Polishing Association of America (CPAA) including:

Gloss Level, also known as Specular Reflection (As discussed in ASTM D523)

The distinction of Image (DOI) and Haze (As discussed in ASTM D40390)

Abrasion Resistance (As discussed in ASTM C944)

Slip Coefficient of Friction or SCOF (As discussed in ASTM C1028 & ANSI B101.1/B101.3)

Roughness Average or Ra (As discussed in ST-115 Surface Refinement Standard)

How it works

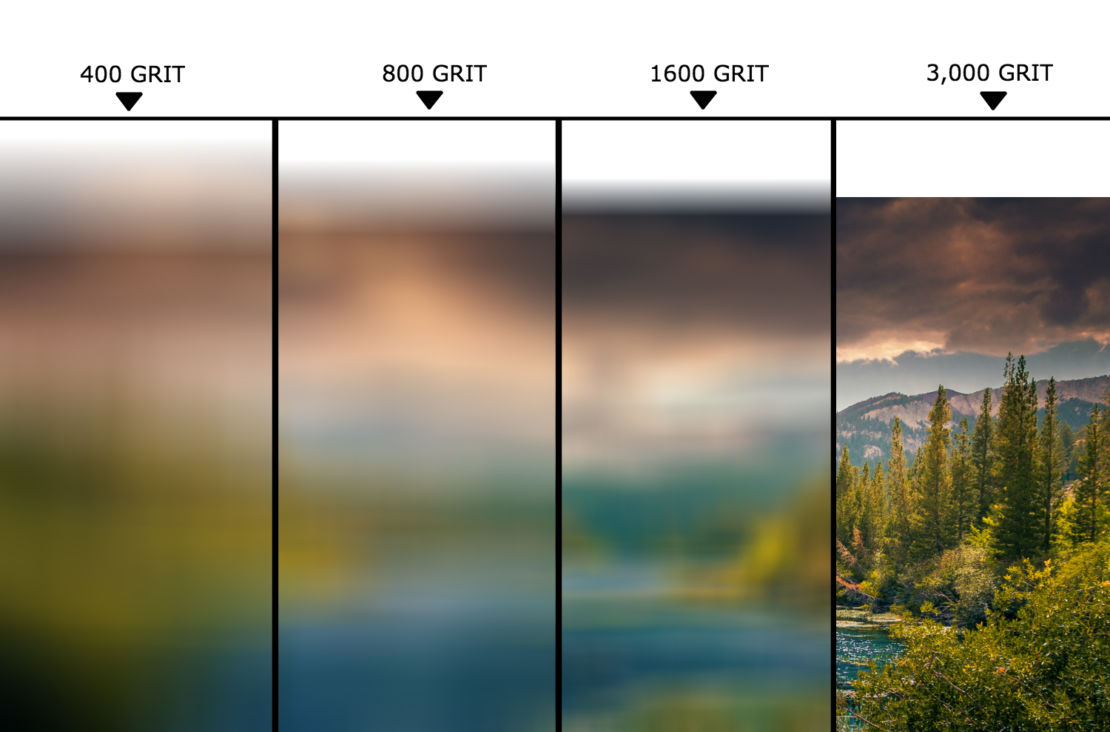
Polishing a concrete floor is like upgrading your old color TV to a new 1080p flat screen! Much like the resolution on a TV, you can start with a lower level of gloss & clarity and work your way up to a higher resolution with a more refined image and better clarity.

You can choose from our most basic polish of 400 grit (much like a Home Depot floor) or go all the way up to 3,000 grit where your floor will look similar to reflecting glass. Talk to a Zenith Professional to determine what level is necessary to get the effect you desire, and learn more about our concrete polishing here!

Polishing Process

Our concrete polishing process has to be done in stages. It typically begins with a grinding process called “cutting the concrete” that removes the soft top layer, commonly known as the “cream layer” of the concrete, as preparation for the polish. This is done with a rough grit grinding disc (usually a 30 grit metal), slowly working our way up to a finer grit grinding disc. With every pass we make with a finer and finer grinding disc, the smoother the surface becomes.

Following the grinding process, we then begin to hone the concrete using what are often referred to as transitional or hybrid discs. As before, we start with a rougher grit pad and move to a finer grit pad with each pass.

Finally, we start making passes with resin polishing pads. We begin with the lowest level (400 grit resin polishing pads) and work our way up to the level of gloss and shine that you are hoping to achieve!

Our polishing team has the option to build on the polish levels from 400 grit, all the way up to 3,000 grit.

Floor Polishing Step 1: 30 Grit Diamonds
The first pass is made with a set of single, 30 grit diamond grinding disc. This first step is almost always repeated with each pass made in a different direction until we are able to get through the top layer of concrete.
Floor Polishing Step 2: 70 Grit Diamonds
The second pass is made with a set of 70 grit diamond grinding disc. At this point, only one pass will be made with each set of grinding dots or polishing pads. The concrete will be cleaned after each set of diamonds/pads.
Floor Polishing Step 3: 120 Grit Diamonds
The third pass is made with a set of single, 120 grit diamonds
Floor Polishing Step 4: 100 Grit Hybrid Pads
The fourth pass is made with a set of 100 grit Hybrid Pads. These are the first pads that begin the polishing process.
Floor Polishing Step 5: 220 Grit Resin Polishing Pads
The fifth pass is made with a set of 220 grit resin polishing pads.
Floor Polishing Step 6: Color (by request) and Densifier
If the floor is only getting polished up to a 400 grit, this is where we add the color (by request) and densifier. At this point after cleaning the floor, we would mask the perimeter and anything that can’t get over-spray on it. The color is then applied with a pump sprayer. If the customer chooses to do a very light, transparent color, then no additional grind is needed. If they choose a dark, rich color, then an additional pass with the 220 grit resin pads may be needed after the color is applied. The densifier is applied to the floor at this point with a pump sprayer. The densifier needs to remain wet on the surface of the concrete for 30 minutes.
Floor Polishing Step 7: 400 Grit Resin, Polishing Pads
The seventh pass is made with 400 grit resin polishing pads. This is done after the 30 minute densifier application period. If the customer chooses to go higher than a 400 grit polish, then the color and densifier will be applied after the pass with 400 grit pads.
Floor Polishing Step 8: Additional Passes with Resin Polishing Pads (optional)
400 grit resin polishing pads is the lowest entry level package that we will offer with concrete polishing with a result similar to Home Depot concrete floors. Additional passes can be made with 800 grit, 1600 grit, 3000 grit, or more, incrementally adding the higher level grit for gloss and shine. Talk to a Zenith Professional to determine what level is necessary to get the effect you desire.
Floor Polishing Final Step: Lithium Protective Finish
However high of grit the customer chooses, the last step will be the lithium protective finish. This product goes on with a pump sprayer and a microfiber broom. Once again, a 30 minute wait period is required for the lithium protective finish to dry. A burnisher and buffing pad is then taken across the entire floor for the final finish!